Archive | Spaces RSS feed for this section

Cheap Frames and a Wall Collage

30 Aug

Last week I escaped the walls closing in around me and went on a frame thrifting binge. I hit up Through our Children’s Lives and Savers (and a few garage sales as I meandered between the two). I’ve wanted to do something with my uninspired “dining room” (because it’s really just a pass-through to the kitchen) wall, and I’ve wanted to do a frame collage for like … ever.

So I came home with a bunch of frames, a can of white spray paint and a few mats and got to work. The frames cost me in all about $10. Love.

Once I decided what to frame, I began the daunting, but necessary task of tracing all the frames onto newspaper and putting a template up on the wall. It’s still not a foolproof method, but it will save headaches and nail holes. Trace each frame onto the paper, cut it out, and then turn it over and punch a hole through the paper where the nail will hang. It’s genius really. And I stole it from Young House Love.

Sorry, I had already hung the first one when I snapped the pic. 😉 Here’s the result, minus one I added yesterday:

I had fun picking out the content of the frames. From family photos (yes that’s one of our engagement pictures … 10 years ago!).

To artsy postcards our hipster friends send us for save the date cards and thank you notes.

And of course I showcased my love of animals with vintage prints.


Then the little artist had to get involved. I love showcasing what those little hands create.


This wall is also fun because you can see it while sitting on the couch in the living room:

Or while cooking in the kitchen:

This little wall makes me happy every time I look at it. It really brightens up the dark paint in that room and I can’t wait to add more and/or change things out.

Clearly Organized

11 Jul

When you live in a house as small as mine with a husband, a 2-year-old, two dogs, a million toys and piles of vintage things taking up space, you quickly learn the art of organization.

What made me most proud was my MIL saying she was proud of me for living with my kitchen. I mean, it’s small.

I’ve taken great pride in using every square inch of space in that kitchen and we were managing just fine. Then a certain child was born.

Kids evidently need snacks.

Thus the top of the fridge starts to look like this:

Looking back I can’t believe we’ve lived with it like this for so long.

So a waited for Hobby Lobby to have a sale on glass and bought some containers all half price.

And once again peace has been restored to the universe.

What’s your best organizing tip?

Home office inspiration

9 Feb

I’ve been dying for a more inspiring space to work lately. I mentioned last time that I’m undertaking a crazy, scary, exciting new venture and my current attic desk space just isn’t encouraging me. So here’s what I’m looking for. 🙂


Found here.

I love the colors in this space. I love all the storage shelves. Mostly I love the giant pinning board behind the desk! I love pinterest, but sometimes I need to pin inspiring things in real life. But I struggle with making a desk pretty because we have two computers, a work phone and tons of wires hanging down the back of the desk.


Found here

I want to hang this right in my face so I see it every day.


Found here.

I want a bright color and I want to stencil. In fact I’m dying to stencil!

Found here.

My inner diva wants this space, but let’s be realistic. Are those built-in speakers in the ceiling? Fabulous.

I’m also torn between dismantling my son’s nursery, putting him upstairs and using his room as my office vs. keeping all our office/estate finds/guitars upstairs out of view. We’re not in a hurry to have another kid at this point, but I’m not sure where we would put one if we did have one. 🙂 So maybe we hope for a new house before next baby comes and I focus on making the attic space an awesome working environment.

Anyone else have inspiring office pics? I’d love to see!

Guest Blogger: Homemade Ginger!

31 Oct

When I look back and see who wrote my first-ever guest post, I’ll be so proud to say it’s my friend Megan from Homemade Ginger. She’s one of those artsy types, so talented, with an amazing sense of style. She loves all things DIY, crafty and natural. Plus, she has two of the most adorable girls in the world, Lula and Jane, and how cool are those names? But I digress. I’ll be posting, as well as featuring a giveaway from my Etsy store over on Homemade Ginger today, too, so go check it out!

Hello Grandma Great’s Treasures readers! Erin and I have become friends through our Bible study over the past couple of years and I was so happy when she started this blog and her awesome Etsy shop! I blog over at Homemade Ginger and am always inspired by vintage things and anything DIY, much like Erin!

I’m so honored to be guest posting today.  I have been doing a little makeover on our master bedroom and I thought I would share my progress so far with everyone! 

When we moved in, the room was pretty much a blank canvas.  

BEFORE

The first thing I did was come up with a mood board for some inspiration on colors and textures:

Although the room now looks pretty different from the mood board, it definitely helped me get the ball rolling.  

We went with a medium gray color for the walls and painted all the trim white.  Anyone who has painted trim knows how much of a pain that can be!!
I bought some fabric online in grays, yellows and oranges.

The top two are both Robert Kaufman’s Metro Living, followed by Joel Dewberry’s nap sack and Khristian A. Howell Bryant Park’s  Rooftop Garden Stone. After painting the walls, I made a yellow headboard.

Such an inexpensive and easy project!!

I used this tutorial as a guide. I also painted some bedside tables that I had inherited. They were looking rather sad before:

But after a few coats of white paint and a new cheerful knob, they are perfect for the space!

My next project was to paint a vintage $6 mirror that I snagged at an antique store.  Originally I was going to put it above the bed, but I decided that hanging it above the dresser was the perfect spot.

After some white paint and a little sanding, it now looks super cute against the gray walls!

To clear up some clutter on the dresser, I came up with a necklace storage solution using a shelf

It adds a little bit of color and interest to that corner of the room, plus it’s an easy way to stash all my necklaces!

On the subject of storage solutions, I whipped up a little fabric book holder for the side of the bed.  As you can see, our bedside tables are pretty tiny and I found this pattern in the book One-Yard Wonders. It has worked great for stashing magazines and books!

My next big project was to make a light fixture for the room. When I saw this coffee filter light tutorial, I knew I had to try it. It was a little time consuming, but definitely worth it!!

As you can see from this next picture, the windows needed a little help with new curtains.

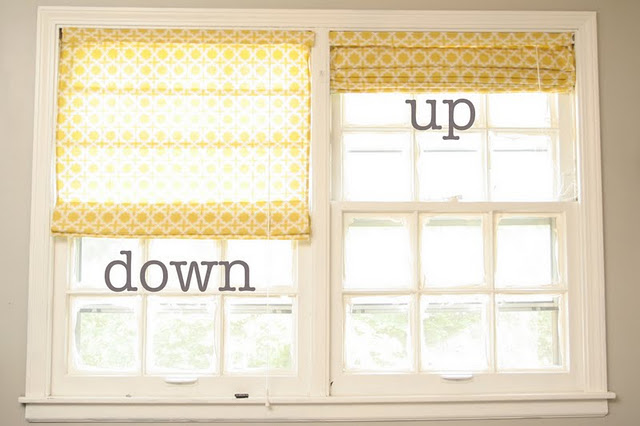
After going back and forth, I decided to make some simple roman shades using some of the yellow fabric that I bought.

I love them. They create such a clean look for the room and the fabric is perfect!

I dyed some white sheets to make curtains for my closet-turned-sewing nook… This was the closet before:

And after (still not totally complete, but much better!)

The curtains were so fast and since I couldn’t find anything in the shade of gray that I wanted, dyeing them was such an easy solution!

Finally, I knew the space above the headboard was empty and drab. After seeing many tutorials on sunburst mirrors, I tried my hand at one and I love how it turned out!! This is the tutorial I followed most closely. Here is the mirror in progress:

And here it is hanging above the bed!

It makes the room feel complete.

I still have a few things I want to do for my master bedroom, but I always leave room for more projects around the house! I don’t think any space will ever be 100% complete. DIY projects are just way too fun! Thanks so much Erin for having me today, it’s been fun!

Easy DIY Door Desk

30 Oct

First let’s put some perspective on this project. The magazine I work on full-time was purchased by an out-of-state company early this year, so starting in February I began working from home. After nine months, the space looked like this:

It wasn’t pretty. Add to that the fact that the Rock Star stays home and watches Liam during the day; so imagine us both crammed together at a corner desk trying to work at the same time. Of course I did make a point to photograph the space at its messiest, just for the effect.

Something had to be done. Inspired by Young House Love’s DIY desk project as well as this space and this Pinterest image here, I decided the most economical, practical and fun solution for my office space was to DIY a door desk. Now, I don’t own a Kreg Jig like YHL, nor did I want to spend a million dollars on a custom piece of glass; the name of the game was cheap.

I visited our local Habitat Restore and found a perfect hollow door for $5. It measures 24″ x 80″. Most of their doors are $5 unless they’re solid or carved or something. It was painted on one side and was relatively in good condition. I gave it a good sanding with the orbital sander and the Rock Star used his crazy mad puddying skillz to fill in the spaces where the hinges were and a couple of random holes where a hook had been installed. I didn’t bother filling in the doorknob hole you see on the side of the door here because it was going to face the wall anyway.


I forgot to take a picture of the after-puddy shot, but I tell you I cannot tell where those holes are anymore. Next I gave the door a good coat of primer and a few coats of Exterior white paint. I used exterior because one lady at Home Depot told me it was more durable, but a guy at the same store told me the only difference was an anti-mildew compound. Oh well…paint is paint for this purpose.

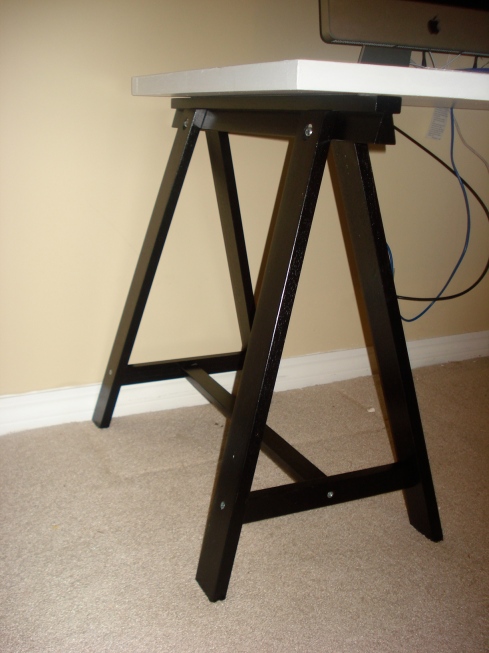
Now for the fun part. You can set a door desk on just about anything, just measure to make sure the height is comfortable to sit at. Mine supports are just over 26″ (we had to cut 1-3/8″ off the sawhorse legs) and perfect for me (and my chiropractor’s rules for ergonomic workspaces). Google DIY door desk and you can see a multitude of things you can use to support a door desk: bookshelves, file cabinets, saw horses, etc. Since most of my house is very vintage, I wanted this space to be sleek and modern…maybe since it goes so well with the equipment. So I chose to use a lateral file cabinet that I got from my previous work for $5 and “splurged” on black sawhorse-looking legs from IKEA. If IKEA would wake up and put a store in KC, it would have only been $15, but I found a deal with a local company called Blue Box Delivery who does the driving and shopping for you and it only cost me $29.45 (much better than IKEA’s shipping cost). Once I set everything in place and re-hooked up all the equipment, I was pretty happy with the result. (Ignoring the broken window and mess of cords.)


Next step is accessorizing, which I started with spider plants in pickle jars and matte spray-painted mason jars for the pens and paperclips.

But it still needs more work. And the problems I see now are the mess of cords (although the doorknob hole makes for a very good cord drop) and how to hide them. If only we just had two laptops to hook up, but when you factor in a modem, router, two computers, a monitor, telephone, two printers, etc, that’s a lot of cords. I was thinking of hanging fabric from the back, but wondered if that might be a fire hazard…guess it’s time to google some ideas.

This was such an easy project that anyone can do. No sawing, no screwing, no nailing, just some paint and the IKEA legs came with rubber pads on the top which helps hold the desk in place.

How about your home office? What have you done to make it more functional or comfortable? I’d love to hear about it!

Linking to:
Photobucket

Refinished Table for Awkward Attic Space

6 Sep

Ah fall, how do I love thee? Let me count the ways. I love thee as much as Forrest Gump loves Dr. Pepper, as much as my son loves graham crackers, as much as Sherry @ Young House Love loves paint. Few things excite me more than candy corn (which I’ve already consumed a whole bag of), skinny jeans with boots, layering clothes, pumpkins, family time, and my birthday. And while it’s not technically fall yet, the temperature has changed and decently allowed me to work outside, a lot, on projects over Labor Day Weekend.

Labor Day evening, we attended a lovely wouldn’t-believe-you-were-in-the-city BBQ at the home of the Rock Star’s drummer (Bill). He is a newlywed and we love his wife Rachel, who happens to be a farmer who works with refugees. You won’t find much cooler or more interesting folks and we’re blessed to know them. Rachel has this insaaaane knack for shabby chic country decor awesomeness, as evidenced by their wedding, and last night’s backyard BBQ in the middle of the city honestly made me reminisce about fireflies in jars and Rachel’s homemade peach pie was to die for. It was an evening well spent, and I learned that the Rock Star’s lead singer gets cooking advice from his mom via The Pioneer Woman, which I find hilarious and I hope it doesn’t ruin his “rock star” image. I put that in quotes just to make him mad. 🙂

But on to the big news! My table, which I previously posted about here is finally finished! When I last left off, the stripping fiasco had led me to a conundrum and finally convinced me to buy a nice electric sander.

This is where it all began.

After stripping fiasco

So on the advice of my friend Kari @ Foreclosure 2 Fabulous, I hooked up that sander and went to town. After A LOT of work, the top looked like this:

And then after a lot MORE work, and removal of the legs, it looked like this:

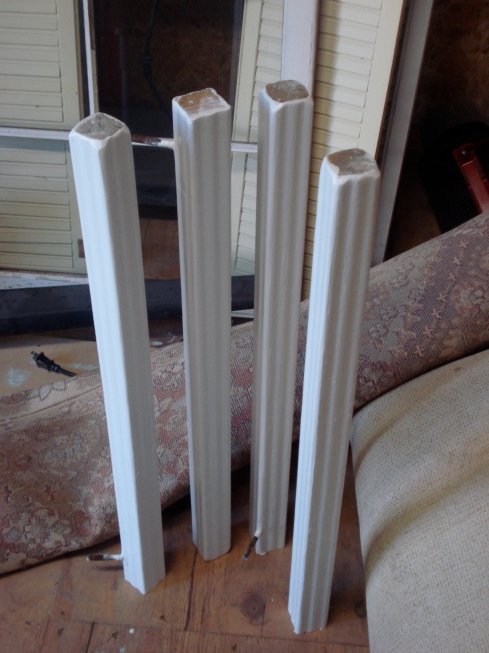
The legs were the hardest part. I knew I couldn’t get them down to bare wood easily, and frankly I knew I wanted to paint the rest of the table, sans the top. Much like John and Sherry did with Clara’s dresser at www.younghouselove.com, but you know, opposite. So the legs got the best-I-could-do treatment and then a layer of primer. The bottom of the desk also got primer and I taped it off because at this point I had already stained the top.

Ater sanding, beginning to prime

Primed

Primed

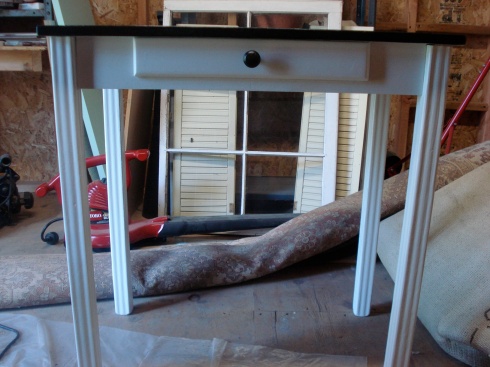
I stained the top with two layers of Minwax Ebony finish. I love, love, love, the dark color and the contrast with the white. Before staining, I used tack cloth to remove any dust particles. I also finished the legs and table base with semi-gloss white paint. It took about three coats. I also added two coats of Minwax polycrylic to the table top, sanding inbetween.

Stained

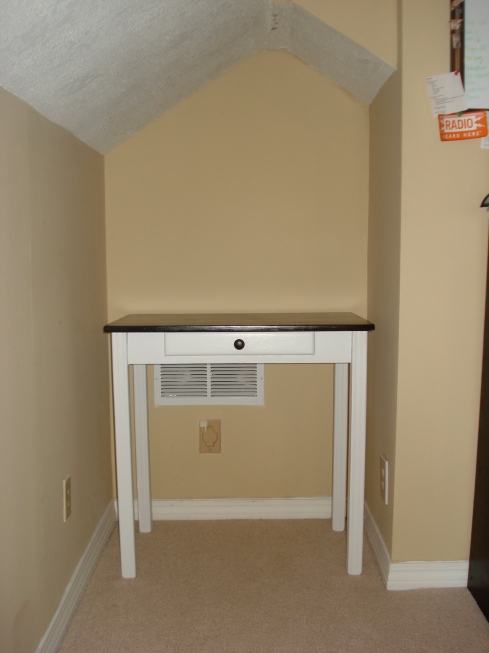
I assembled the table in our workshop before carting it up to the attic and accessorizing (the best part). It fit perfectly in the awkward attic space.


Accessorizing was easy. I had dreamed this entire project up as a place to display my vintage Underwood typewriter. I love the color and it has special significance seeing as how I’m an editor/writer in real life. I also needed to fill the vertical space, so I quickly grabbed some sticks (which are plentiful thanks to some recent storms) and sprayed them flat white. I placed them in my Pinterest Challenge painted Mason jar, which is matte black and I love. The cases underneath are actually the typewriter’s carrying case and a vintage suitcase I’ve had lying around.

Accessorized


I am so glad this project is over. I walk upstairs to my home office and smile now. It’s the first thing I see. I tend to find projects require so much more work than I expect, but the end result is so very worth the effort.

I spent $5 on this table. I purchased stain and polycrylic, tack cloth, and a new knob. Everything else I had on hand.

Cheers to repurposing what may have ended up in the dumpster!

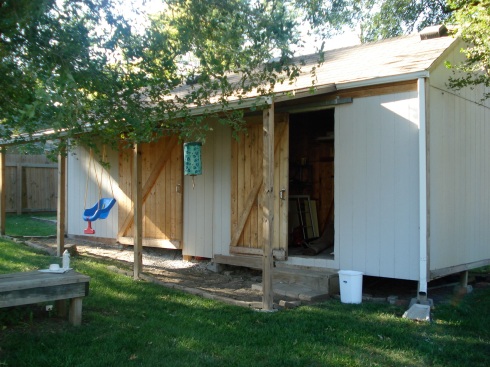
P.S. Since I’ve been spending so much time there lately, I thought I’d give you a peek at our workshop. It was almost a reason not to buy our house since it takes up about 1/3 of the yard, but for storing my projects and working on them, there’s nothing better! The left side is a shed with gravel floor, great for storage and lawnmower/ladder duty, the right side is electrified featuring power tools, paint, screwdrivers and random projects too precious for the shed side. 😉 Please ignore the been-dead-for-a-year Topsy Turvey tomato planter. It should have been taken down a long time ago, but it’s too darn heavy, and there’s an albino spider living inside it.

It’s OK for girls to love workshops, right? Cause I sure do!

Linking to
<a href="” target=”_blank”>Between U & Me


Photobucket
”Totally

Nursery Makeover

29 Aug

Last weekend seems like a blur. Due to money issues and too-many-projects-stacking-up issues, I had to cancel a trip to Wichita to see friends. It was sad, but necessary.

Friday morning I picked up a birthday gift from my mom. She laughed and asked if I was serious when I told her I wanted this. But it’s a glorious sander. It’s 4-in-1 so it is orbital, detail, super detail and flat-edge. So far, so good. I got a lot of work done on my small table project. I can’t wait to get it finished to reveal the results. It’s just fabulous.

The Rock Star has been fighting a sickness for a while and managed through a gig on Saturday that was a super blast, but unfortunately he gave us the sickness. Runny noses, sinus pressure, sore throats, earaches, no energy. It’s a tad miserable and I spent most of Sunday sleeping. Thus, the table project did not get completed. I’m still sick today but fighting through work to ship our magazine tomorrow and hopefully I’ll have some time/energy to finish the table this week.

We’re also planning a garage sale for Friday/Saturday so I’m not sure if I’m crazy or just desperate to get rid of stuff. We just had a garage sale two years ago, but my tastes have changed and somehow stuff has accumulated once again. I swear I’m not a pack rat.

Oh, I also swore off the sales last weekend to actually get some work done, so no treasures to share this week.

To fill the void, here’s another flashback from more than a year ago when we created our son’s nursery.

There is only one before picture, but the walls were a terrible shade of puke and the trim had unfortunately been painted offwhite. We loved the original trim/doors/hardware in this home, so it was sad to see it painted. This was the room we dumped everything in. And the treadmill was sadly, rarely used. It was moved to the basement (where I have used it twice in the past week, hooray!) by my uncle and cousin (crazy Insanity workout guys).

We didn’t know if we were having a boy or a girl and I didn’t want to paint the walls tan because of that. So I figured the bright teal was a good neutral for a baby. It could be accented with pink for a girl or brown for both. I opted for dark furniture to contrast and gray fabric and rug. We painted the trim white and the Rock Star, who just happens to also be a gifted artist, painted the tree on the wall over the crib. I love it so much. We went for an owl theme, which has since blown up in popularity, as has the name Liam, but I don’t mind. I also went simple with the bedding because I don’t tend to like the over-the-top matchy-matchy bed sets they make nowadays. I sewed the crib skirt myself as well as the curtains. Then just added a breathable bumper and simple white or brown sheets.

And this is his room before birth. It has definitely changed since then. I’ll post an updated pic on this post later, once it’s cleaned up enough to be presentable. 😉 Hope you enjoy.

This slideshow requires JavaScript.

Linking to

A Bold Change: Dining Room Makeover

11 Aug

To say my dining room lacked inspiration would be an understatement. For a second time I’m not sure what to call the color, but it was a yellowish tan and there was a strip of wood running as a chair rail around the room. I thought, what a random placement of wood since the bottom and top were both painted the same, until my dad and I removed the rail. It was hiding the top seam of wallpaper that was around the bottom of the wall. Suddenly we had a mess on our hands and some very tedious scraping sessions.

However, I knew I wanted bead board around this room to contrast with the ridiculously dark color I chose. I don’t do calm, serene spaces. I do bold, slap-you-in-the-face, here-I-am-love-me rooms. And this was no exception. The small rooms in my house demanded to be heard. I was loving the dark navy and white rooms I was seeing at the time and decided to go bold or go…home?

So the bead board covered up the wallpaper mess around the bottom (I feel very sorry for the poor sap who removes it) and I think the dark, dark, probably darker than I imagined navy gives this tiny space life. The space is accented with my Grandma Great’s kitchen table (I spent many an afternoon at this table eating cookies and drinking grape soda), some bird plates from Pier One, ramekins my mom gave me from Crate and Barrell, some lace curtains I mended from a garage sale, and a secretary I scored at an estate sale.

This slideshow requires JavaScript.

America’s Smallest Kitchen, Before and After

11 Aug

Since I only recently started this blog, I’ve been going through old pictures and catching up on what we’ve done since buying our first home. Here are some before and after pictures of a few rooms.

Kitchen first. Here’s the thing. I didn’t buy this house for the kitchen; I bought this house in spite of the kitchen. Everything else was so lovely I figured we could deal with what may be America’s smallest kitchen for a few years. The paint color was a particularly heinous color of um…burnt salmon? I’m really not sure.

But I knew what I wanted it to look like. I wanted to keep in line with my love of retro kitchens but also make a bold statement in a small space. Our house was built in 1940, so I also wanted to play off the lovely charm of that era. That’s where the green comes in. We had painted the cabinet doors white; they were left natural before, which I totally didn’t get, but to each his own. And I also added the adorable vintage yellow cart under the pantry cabinet. Ignore the gigantic box of EasyMac. It was a problem, but I’m working on it. More on my space saving ideas in my tiny kitchen to come…

This slideshow requires JavaScript.